API Test Automation — Frequently Asked Questions
Why is Environment Setup mandatory before creating a Test Suite?
To ensure consistency, accuracy, and controlled execution, QAEverest now requires users to configure an environment before creating a Test Suite.
Environments define:
• Base URL
• Configuration variables
• Authentication & authorization details
This prevents test failures caused by missing configurations.
What is an Environment in QAEverest?
An Environment is a configuration layer that defines where and how your API tests will run.
It includes:
• Environment Name (e.g., Dev, QA, Staging, Production)
• Base URL
• Environment Variables
• Authentication & Authorization details
What happens if I try to create a Test Suite without configuring an environment?
The system will:
• Prevent Test Suite creation
• Display a prompt to configure an Environment first
• Redirect you to the Environment Settings page
This ensures all test suites are properly linked to a runtime configuration.
How do I create an Environment?
Go to:
API Automation → Environment Settings
Then:
1. Enter Environment Name
2. Enter Base URL
3. Click Add
4. Configure variables (if required)
5. Configure authentication (if required)
Once saved, the environment becomes available for suite creation.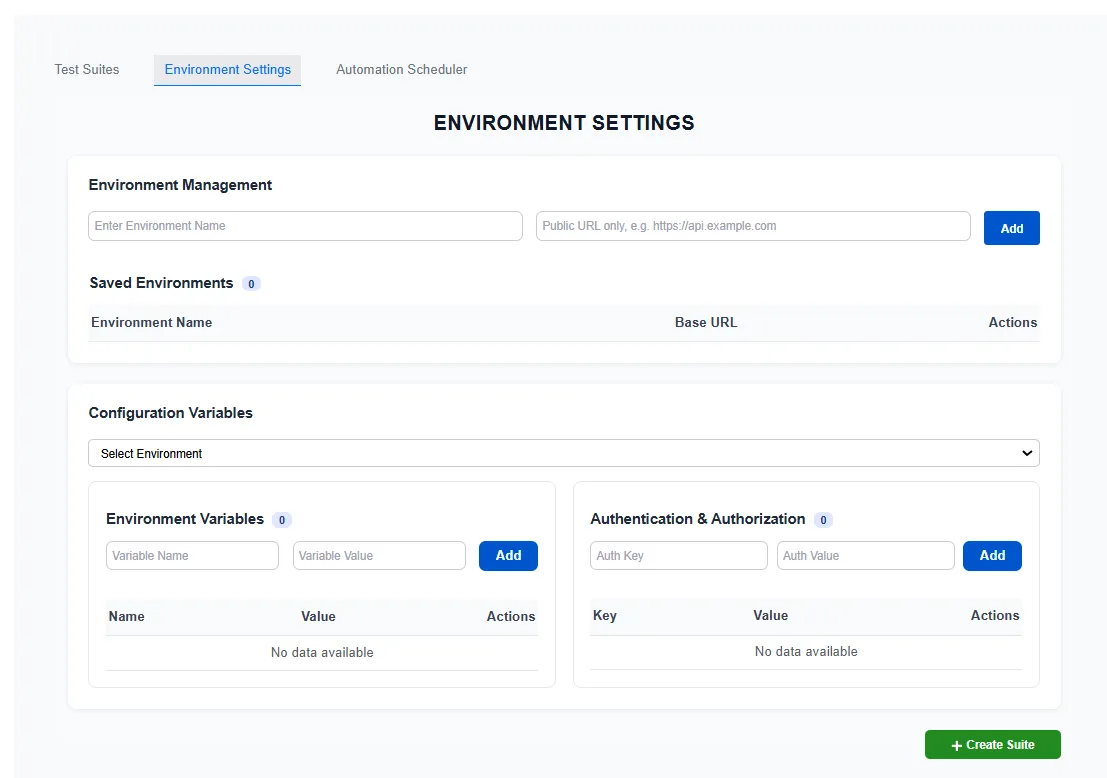
Can I create multiple environments?
Yes, you can create multiple environments such as:
• Dev
• QA
• UAT
• Staging
• Production
Each Test Suite must be linked to one environment.
How to Create a Test Suite
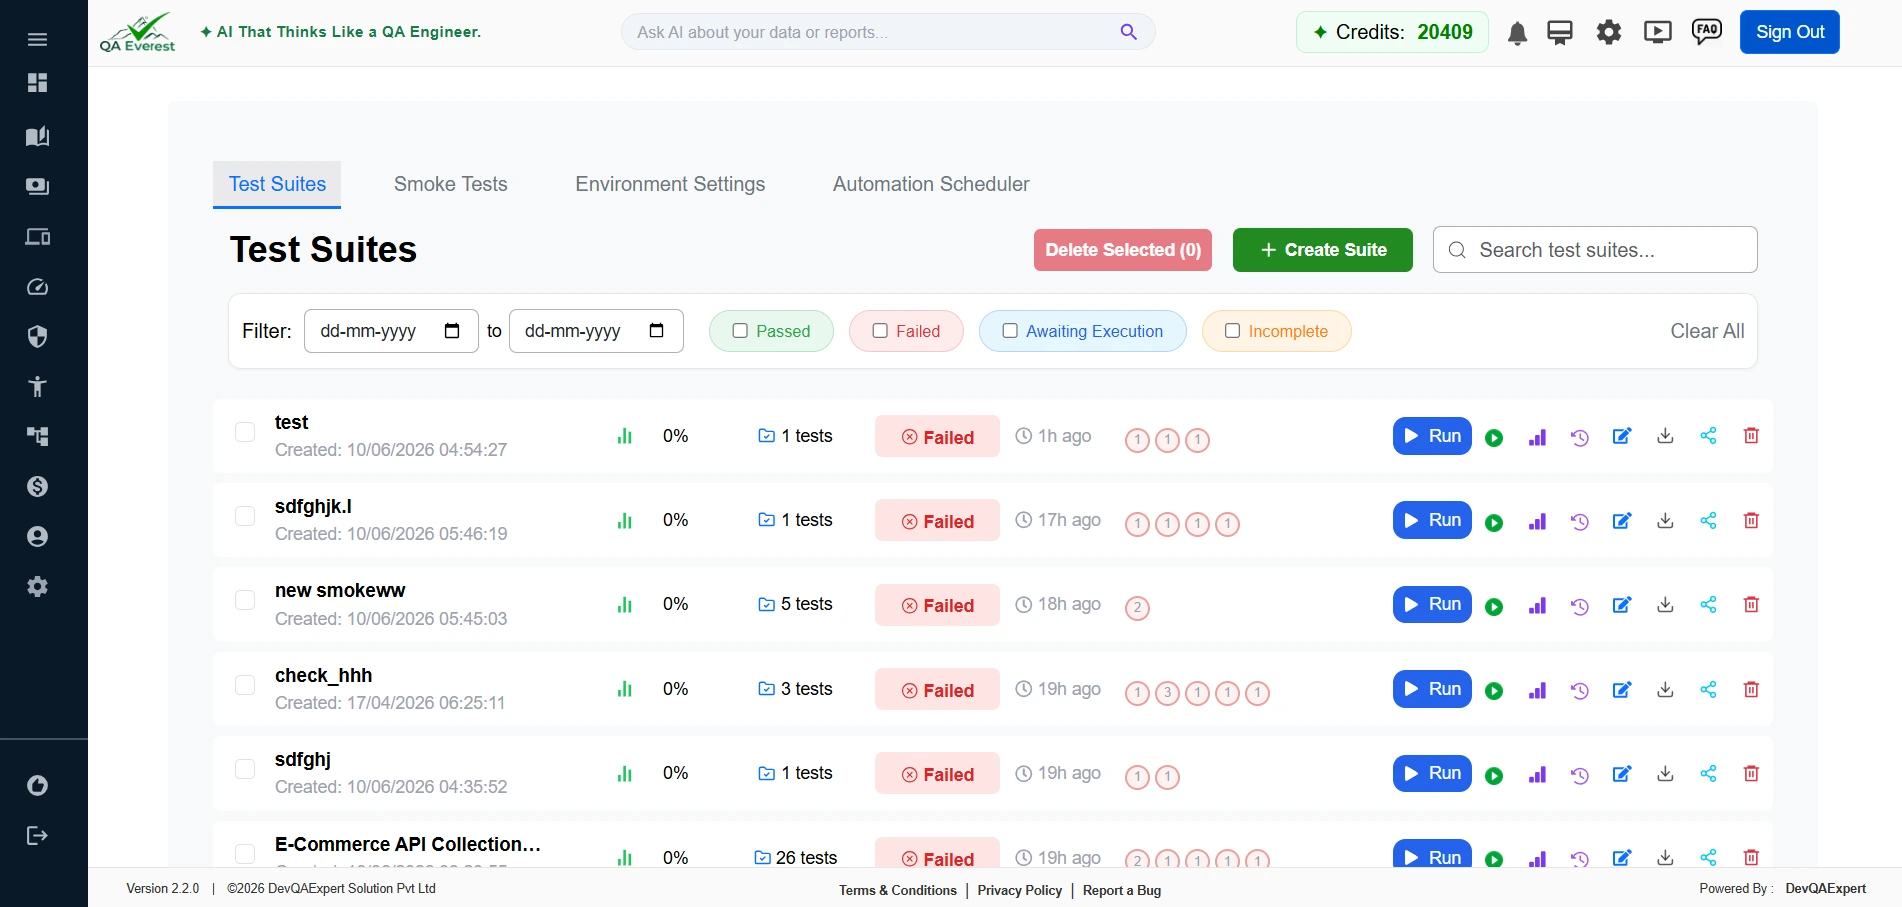
Step 1: Access the Suite Creation Page
- Navigate to the main dashboard and click on the "+ Create Suite" button.
Step 2: Fill in Suite Specifications
- Title: Enter a descriptive title for your test suite.
- Base URL: Input the base URL for the application you are testing.
- Environment Name: Specify the environment name if applicable.
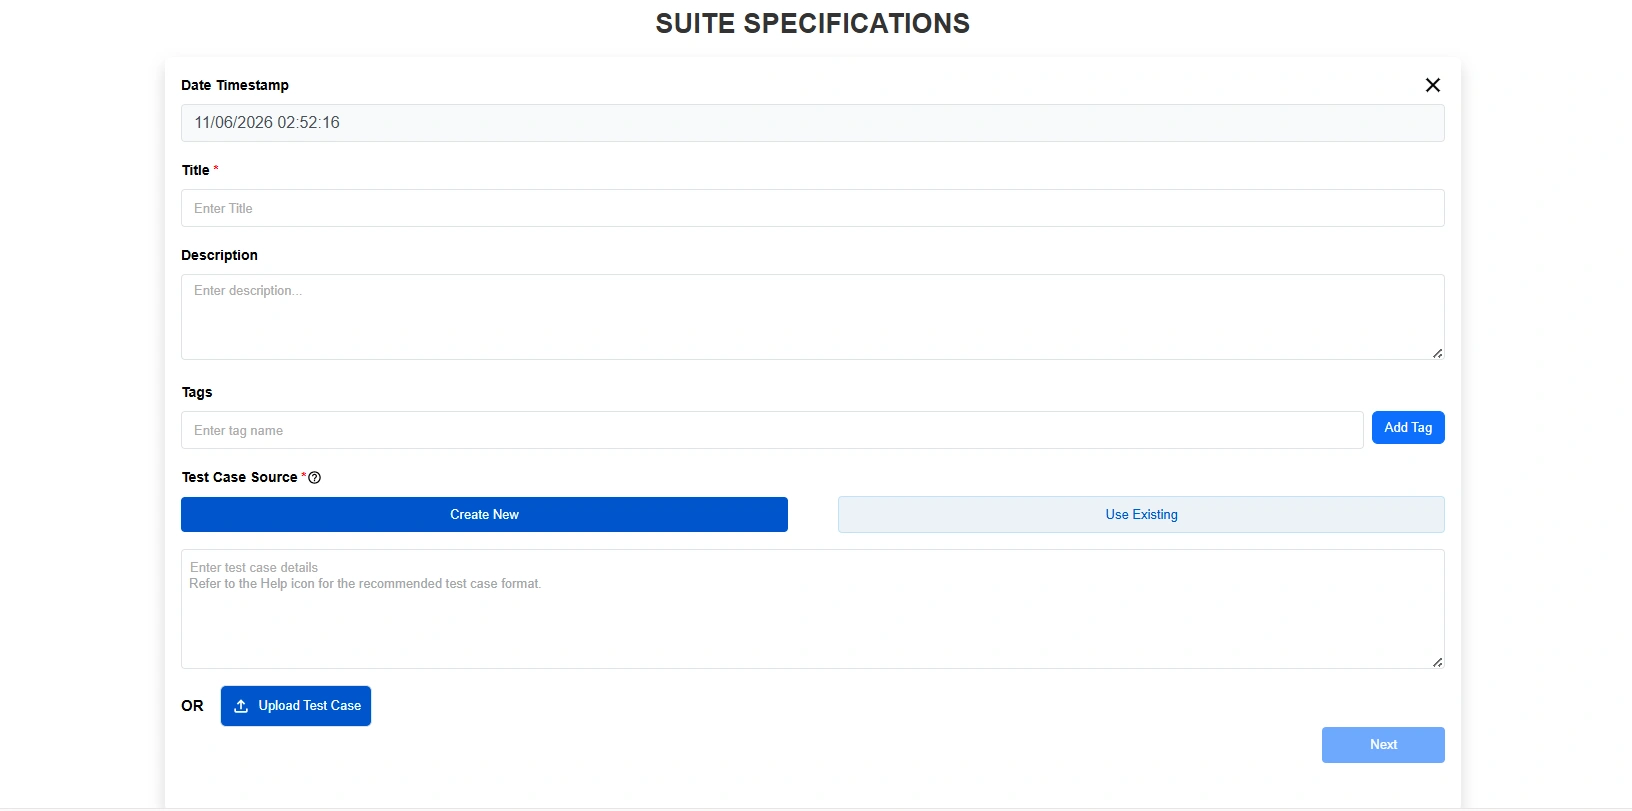
Step 3: Choose Test Case Source
- Create New: Click this button to manually enter test case details in the provided text area.
- Upload Test Case: Use this option to upload a pre-existing test case file.
Step 4: Save Your Suite
- After filling in all the necessary details, click the "Next" button to proceed.
Additional Functionalities
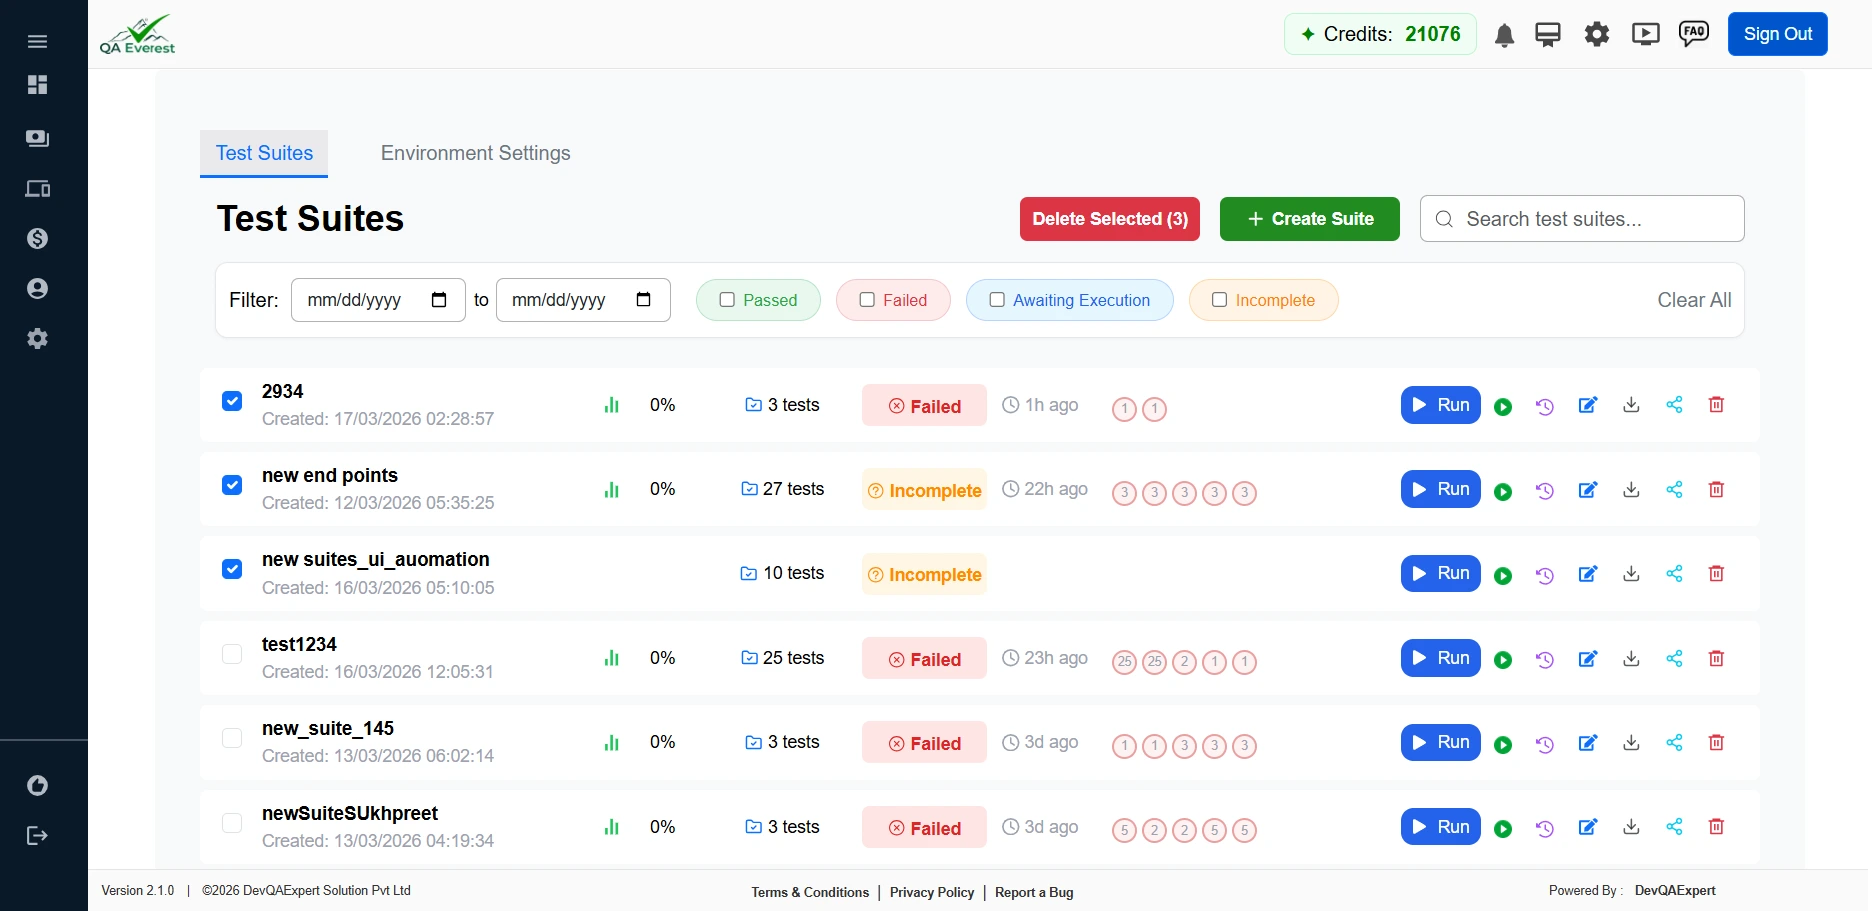
1. Viewing Test Suite Results
- After creating a suite, you can view its results by navigating to the "Test Suites" page.
- Each suite displays its status (Passed, Failed), number of tests, percentage of success, and the last run timestamp.
2. Managing Test Suites
- You can select multiple suites using the checkboxes and perform bulk actions like deletion using the "Delete Selected" button.
- Use the search bar to quickly find specific test suites.
3. Editing Test Suites
- Click on the pencil icon next to a suite to edit its details.
4. Cloning Test Suites
- Use the clone icon to create a copy of an existing test suite, which can be modified as needed.
5. Running Test Suites
- The play icon allows you to run a selected test suite.
6. Downloading Reports
- Click on the download icon to retrieve a detailed report of the test suite results.
7. Accessing Suite Logs
- The eye icon provides access to the logs for a deeper analysis of the test suite execution.
8. Deleting Test Suites
- Use the trash bin icon to delete a test suite permanently.
Troubleshooting
Why can't I create a new test suite?
Ensure all required fields (Title, Base URL) are filled out correctly.
How do I upload a test case file?
Click the "Upload Test Case" button and select the file from your device.
What formats are supported for test case uploads?
Supported formats include JSON, XML, and CSV.
How can I view the results of a test suite?
Navigate to the "Test Suites" page and click on the suite you want to view.
Can I delete multiple test suites at once?
Yes, select the suites using the checkboxes and click "Delete Selected".
How do I edit a test case in QA Everest?
To edit a test case, navigate to the test suite where the test case is located, click on the test case to open it, and then click the pencil icon to edit the details. You can modify the title, steps, and any other relevant information.
What information is required when creating a new test case?
When creating a new test case, you need to provide a title and define the steps for the test case. Each step should include the request method, endpoint, headers, and expected outcomes such as response codes and body content.
How do I specify the request method and endpoint for a test case?
In the test case editor, you can specify the request method (e.g., POST) and endpoint (e.g., products/add/2) under the "Request" tab. This is where you define how the test case will interact with the application.
What headers should I include in my test case?
You should include any necessary headers that are required for the API to process the request correctly. For example, if the API expects a JSON payload, you would include a Content-Type header set to application/json.
How do I define the expected outcomes of a test case?
Under the test case editor, you can define expected outcomes such as the response code (e.g., 201) and the content of the response body (e.g., it should contain "id" and "title"). These expectations are used to validate whether the test case passes or fails.
Can I add multiple steps to a test case?
Yes, you can add multiple steps to a test case by clicking the "+ Add Step" button in the test case editor. This allows you to create complex test scenarios with multiple interactions.
How do I run a test case?
To run a test case, navigate to the test suite containing the test case, select the test case, and click the "Execute Selected" button. This will execute the test case against the specified environment.
What happens if a test case fails?
If a test case fails, it will be marked as failed in the test suite results. You can click on the failed test case to view detailed logs and understand why it failed.
How can I clone a test case?
To clone a test case, click on the test case to open it, and then click the clone icon. This will create a copy of the test case that you can modify as needed.
Can I delete a test case?
Yes, you can delete a test case by clicking on it to open it, and then clicking the trash bin icon. This will permanently delete the test case.
How do I view the results of a test case?
After running a test case, you can view its results by navigating to the test suite and clicking on the test case. The results will show whether the test case passed or failed, along with any relevant logs or error messages.